

Saliva looks like water and is anything but. Roughly 99 % of it is water, and the remaining 1 % does the work: electrolytes that buffer the mouth against acid, mucins that make the fluid slippery, lysozyme and immunoglobulin A that limit bacterial growth, and α-amylase, which begins digesting starch before the food is swallowed. Suspended in that fluid is a population of solid material — flat squamous cells shed from the lining of the mouth, bacteria in enormous numbers, food debris and strands of mucus. A drop of it under a microscope is one of the quickest ways to show a student that a body fluid is a suspension of cells rather than a clear liquid, and it is also a good introduction to the central problem of light microscopy: living cells are transparent, so magnifying them is not enough. You have to give them contrast. In this laboratory you will prepare two slides from the same saliva sample, one plain and one with a drop of Lugol’s iodine added, and examine both through the same three objectives, 40×, 100× and 400×. The comparison between the two slides at the same magnification, rather than the magnification itself, is the point of the exercise: the plain slide shows how little is visible without a stain, and the stained slide shows what the stain reveals.
Educational Goals
Operation of a compound microscope
- Switch on the instrument and its illuminator, and explain why transmitted light from below suits a transparent specimen.
- Change objectives in the correct order, from 40× upwards, and refocus with the coarse adjustment after each change.
Understanding of magnification and resolution
- Calculate total magnification as the product of the objective and the 10× eyepiece, and read the two numbers engraved on an objective as magnification and numerical aperture.
- Explain why the highest objective is not always the right one to start with, and why magnification beyond the resolving power of the lens adds nothing.
Preparation of a wet mount
- Place a drop on a slide, lower a coverslip without trapping air, and blot the excess so the coverslip sits flat.
- Prepare a matched pair of slides that differ in one respect only, so that the effect of the stain can be attributed to the stain.
Use of a contrast stain
- Add Lugol’s iodine to the second slide and describe what becomes visible that was not visible before.
- Explain that a stain works by absorbing light in some structures more than in others, and that it kills the cells in the process.
Identification of what is in the sample
- Recognise squamous epithelial cells by their size and shape, and distinguish them from mucus strands, debris and bacteria.
- Separate what belongs to a living organism from what does not, and be honest about which of the small objects cannot be identified at this resolution.
Recording and reporting observations
- Save an image at each magnification and label it with the slide and the objective used.
- Write a description that states magnification, what was seen, and what could not be resolved.
Protocol
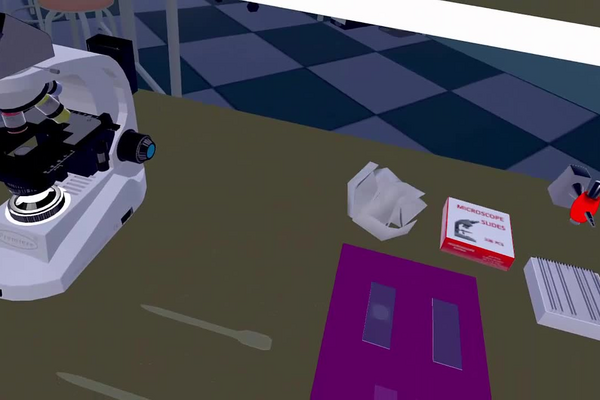
In front of you is an optical microscope with 4 objectives. In order to make use easier, certain features are disabled and are used in more advanced laboratories.
Please note that total magnification is calculated by multiplying the magnification of the objective (for example, 4x) with that of the eyepiece. The microscope used in this laboratory has a 10x magnification eyepiece. For example, an objective with a 4x magnification will result in a total magnification of 40x.
Preparation
1. Turn on the microscope by pressing the switch on the front of the device. You will turn on the illuminator, so that the transmitted light passes through the sample from below, which is ideal for transparent specimens.
2. Place two clean slides on your work area.
Preparation of the first slide
1. Place a drop of saliva on the first slide.
2. Cover the slide with a coverslip.
3. Carefully blot the excess saliva with absorbent paper.
Preparation of the second slide
1. Place a drop of saliva on the second slide.
2. Place a drop of Lugol on that same slide.
3. Cover the slide with a coverslip.
4. Carefully blot the excess Lugol with absorbent paper.
Observations
Observation of the first slide (saliva only)
1. Place the first slide on the microscope stage.
2. Click the « Microscope « button on the tablet to view the microscope image.
You can save an image of the observed view by clicking the « Save image « button, located in the lower left area of the « Microscope « section.
3. Adjust the magnification by touching the microscope objectives. Begin observation at 40x magnification (red objective – labeled Plan 4/0.10).
4. Refine the focus with the coarse adjustment knobs located on the left and right of the microscope.
5. Gradually increase the magnification from 40x to 100x (yellow objective – labeled Plan 10/0.25), then to 400x (blue objective – labeled Plan 40/0.65), adjusting the focus as required.
Note: A magnification of 1000x (white objective – labeled Plan 100/1.25) requires the use of oil between the objective and the coverslip. We therefore do not use this objective in this laboratory.
Observation of the second slide (saliva and Lugol)
1. Replace the first slide with the second slide containing the saliva and the Lugol.
2. Starting at 100X magnification (yellow objective – labeled Plan 10/0.25), note the presence of cell nuclei, which should appear colored brown by the Lugol.
* Do not forget to record the important observations !
Turn off the microscope
1. Turn off the microscope by pressing the switch on the front of the device.
Observation questions
1. What do you notice in the unstained saliva slide (without Lugol) ?
2. What is the purpose of Lugol in the experiment ?
3. Which part of the cell becomes more visible after adding Lugol, and why ?
4. Why must you always begin observation at low magnification (40x) before moving to 100x or 400x ?
5. Based on your observations, which structures in saliva belong to a living being (human cells) and which are non living elements (mucus, debris, etc.) ?
6. For each magnification, compare what you see in your saliva slides with a published reference image of cheek epithelium (see the reference image supplied with this lab). This protocol does not prepare a cheek smear, so the comparison is made against the reference rather than against a slide you have made yourself.
Reference image — cheek epithelium. This lab prepares saliva slides only; it does not take a cheek smear. Question 6 is answered against a published reference micrograph of cheek epithelial cells, which the teacher supplies alongside the lab. What to point out in it: cheek cells arrive as large, flat, intact polygonal cells, often in sheets, each with one clearly visible round nucleus and a clean background. Saliva, by contrast, contains cells that have already been shed — scattered, folded or broken, mixed with mucus strands, bacteria and food debris. The cells are the same type; what differs is their condition and what surrounds them.
Anticipated Outcomes
Results are found in this document (PDF)
Both slides carry the same saliva. What changes between them is contrast, and what changes between objectives is how small a detail can be separated from its neighbour. The first table gives, for each objective in the simulation, the numbers engraved on it and what it can be expected to show on each of the two slides.
| Objective | Total magnification | Smallest detail resolved | Field of view | Plain saliva slide | Saliva + Lugol slide |
|---|---|---|---|---|---|
| Plan 4 / 0.10 (red) | 40× | about 2.8 µm | about 4.5 mm | A pale, almost empty field. Scattered grey specks and the dark circular outlines of trapped air bubbles are the most conspicuous objects; cells are barely detectable | The field takes on the yellow-brown cast of the iodine and the denser clumps of material become visible as darker patches |
| Plan 10 / 0.25 (yellow) | 100× | about 1.1 µm | about 1.8 mm | Faint irregular outlines of flat cells and grey granular debris; still very low contrast | Cell outlines stand out against a yellow-green background and the nuclei appear as small brown dots — this is the magnification at which the stain first pays off |
| Plan 40 / 0.65 (blue) | 400× | about 0.42 µm | about 0.45 mm | One or two cells fill much of the field as pale grey outlines, surrounded by granular material; nuclei are hard to make out | A single stained cell fills the field: brown-green cytoplasm with visible granularity and a clearly darker, rounded nucleus |
| Plan 100 / 1.25 oil | 1000× | about 0.22 µm | about 0.18 mm | Not used in this laboratory: the objective requires immersion oil between the lens and the coverslip and is disabled in the simulation | Not used |
The second table lists what is actually in the sample, with the size of each object, so that a student can decide from the numbers alone which objective is needed to see it.
| What is in the drop | Typical size | Unstained | After Lugol |
|---|---|---|---|
| Squamous epithelial cell shed from the mouth lining | 50 to 70 µm across, very thin and flat | A faint irregular outline, easy to miss because the cell is almost as transparent as the water around it | A clearly bounded polygonal cell, cytoplasm tinted brown-yellow to olive |
| Nucleus of that cell | 8 to 12 µm | Barely distinguishable from the cytoplasm | The single most obvious feature of the slide: a compact, distinctly darker brown body near the centre |
| Mucus strands | Irregular, tens to hundreds of µm long | Very faint, wispy, often only visible where they wrinkle | Tinted and much easier to trace; they tend to hold clumps of debris together |
| Bacteria | Cocci about 1 µm, rods 1 to 3 µm long and about 0.5 µm wide | Invisible at 40×, at best moving specks at 400× | Small dark dots at 400×, at or beyond the resolution limit — countable in principle, not identifiable |
| Food debris and granules | A few µm upwards | Grey granular material, the most visible thing on the plain slide | Strongly stained where starch is present, since iodine is a starch reagent |
| Air bubbles under the coverslip | Tens to hundreds of µm | Sharp, very dark, perfectly circular outlines — an artefact, not a structure | Unchanged; a stain does not stain a bubble, which is a useful way to identify one |
The two numbers on the objective, and what each one buys. Total magnification is the product of the two lenses in the path: M = Mobjective × Meyepiece, so the 4× objective with the microscope’s 10× eyepiece gives 40×, and the 40× objective gives 400×. Magnification alone, though, only makes the image bigger; whether two nearby points remain distinguishable is set by the second number, the numerical aperture. Abbe’s criterion gives the smallest resolvable separation as d = λ / (2 NA). Taking λ = 550 nm, in the middle of the visible range, the 0.10 objective gives d = 550 / (2 × 0.10) = 2750 nm, that is about 2.8 µm; the 0.25 objective gives about 1.1 µm; and the 0.65 objective gives about 0.42 µm. A 60 µm epithelial cell is comfortably resolved by all three, its 10 µm nucleus by all three as well, but a 1 µm bacterium is beyond the first, marginal at the second and only just within the third. Pushing the eyepiece magnification higher would enlarge the image without adding detail — empty magnification — which is why the oil immersion objective, whose NA of 1.25 genuinely does resolve finer detail, is the only route to seeing bacteria properly.
Why you start at low power. The field of view shrinks in proportion to the objective magnification: with a field number of 18, the visible diameter is roughly 18 / Mobjective, giving about 4.5 mm at 40×, 1.8 mm at 100× and 0.45 mm at 400×. At 400× you are looking at less than half a millimetre of a slide that is 20 mm wide, so if you begin there you will almost certainly be looking at empty liquid. Depth of field shrinks with NA at the same time, so the higher objective is also harder to focus. Finding the specimen at 40×, centring it, and only then climbing the objectives is not a formality; it is the only efficient way to work.
What Lugol’s iodine actually does. Lugol’s solution is iodine dissolved in potassium iodide as the triiodide ion. It is best known as the starch reagent — triiodide trapped inside the amylose helix gives the familiar blue-black — and that is why food debris on the slide can stain strongly. On the cells themselves it acts as a general contrast stain rather than a specific one: iodine binds to glycogen and to proteins, and because the nucleus is the densest concentration of macromolecules in the cell, it takes up more stain than the thin surrounding cytoplasm and appears as a distinctly darker brown body. That is the whole mechanism, and it is worth being clear with students that no chemical specificity is involved: a cheek-cell preparation in a school laboratory is more often stained with methylene blue, which binds nucleic acids and gives a cleaner blue nucleus. The price of any of these stains is the same: they kill the cell, so nothing seen on the second slide is alive.
Summary of Assignment by Grade Range
Grade 9–10
- Focus: operating the microscope correctly, and seeing for themselves what a stain is for.
- Activities: prepare both slides and view each at 40×, 100× and 400×; save and label an image at every magnification; draw what is visible on each slide at 400× side by side; name the structures identified and say which objects could not be identified; state in one sentence why the second slide is easier to read; and give the rule for the order in which objectives are used.
Grade 11
- Focus: the quantitative side of microscopy — magnification, numerical aperture and field of view.
- Activities: calculate the total magnification of each objective with the 10× eyepiece; use d = λ / (2 NA) with λ = 550 nm to work out the resolution of all four objectives, including the oil immersion one; estimate the diameter of an epithelial cell by comparing it with the field of view; decide from those numbers which objects in Table 2 each objective can and cannot resolve; and explain what Lugol binds to and why the nucleus takes up more of it than the cytoplasm.
Grade 12 / College Level
- Focus: contrast as the real limitation of light microscopy, and the design of a preparation.
- Activities: explain why an unstained cell is nearly invisible in brightfield in terms of absorption and refractive index, and describe how phase contrast or differential interference contrast recovers the image without a stain; explain the role of immersion oil in raising numerical aperture above 1 and calculate the resolution gained; distinguish empty magnification from a genuine increase in resolving power; justify a choice of stain for this specimen and compare Lugol with methylene blue and with a Gram stain, stating what each would reveal; and set out how the sample would have to be prepared and counted for a statement about bacterial abundance in saliva to be defensible.
Laboratory essentials
Instruments
- Compound microscope with illuminator and four objectives: Plan 4/0.10, Plan 10/0.25, Plan 40/0.65 and Plan 100/1.25 oil (not used), with a 10× eyepiece
- Microscope slides (2)
- Coverslips (2)
- Tweezers
- Droppers
- Beaker (50 mL)
- Absorbent paper towel, for blotting the excess liquid
Products
- Human saliva in suspension
- Lugol’s iodine solution 2 %