

Plant cells were the first cells anyone ever saw. In 1665 Robert Hooke put a shaving of cork under a microscope, found it divided into tiny compartments, and borrowed the word cell from the small rooms of a monastery. What made cork legible where animal tissue was not is exactly what makes plant material the better teaching specimen today: a rigid cellulose wall around every cell draws a visible boundary whether the cell is stained or not.
Elodea, the aquatic waterweed, is the standard choice. Its leaf is only two cell layers thick, so a whole leaf can be mounted flat without sectioning and light passes straight through it. Inside each cell sit dozens of chloroplasts, dense with chlorophyll and therefore green enough to be seen with no stain at all, while a single large central vacuole occupies most of the volume and presses the cytoplasm and the chloroplasts into a thin layer against the wall. Almost every distinctive feature of a plant cell — wall, chloroplasts, vacuole, an orderly tissue geometry — is visible in one preparation.
The nucleus is the exception. It is present in every cell but is nearly transparent and easily lost among the chloroplasts, which is why the laboratory uses two slides rather than one. The first is a plain water mount, showing the cells as they are. The second receives a drop of Lugol’s solution — iodine in potassium iodide — which binds to proteins and nucleic acids and tints the nucleus a distinct yellow-brown. You will switch on the transmitted illuminator, work up through 40×, 100× and 400× using the coarse focus only at the lowest power, save an image at each step, and compare the two slides directly. Read alongside laboratory 024 on animal cells, the pair makes the structural difference between the two kingdoms visible rather than merely stated.
Educational Goals
Familiarization with the laboratory environment
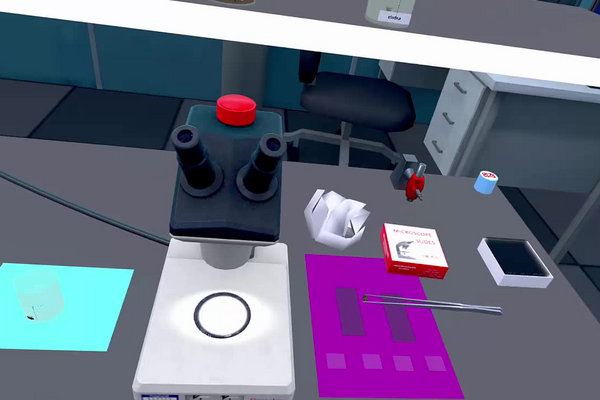
- Locate the microscope and its switch, the three usable objectives, the coarse and fine focus knobs, the stage, the beaker, the tweezers, the slides, the coverslips and the absorbent paper before beginning.
Operation of a compound light microscope
- Set up transmitted (bright-field) illumination from below and explain why a two-cell-thick leaf is an almost ideal specimen for it.
- Change objectives in ascending order — 4×, then 10×, then 40× — and calculate the total magnification each gives with a 10× eyepiece.
- Use the coarse focus only at the lowest magnification and the fine focus at higher ones, and explain why the 100× oil-immersion objective is excluded from this laboratory.
Preparation of a wet mount
- Transfer a small leaf with tweezers without tearing or folding it, flood it with liquid, lower a coverslip without trapping air, and blot the excess so the coverslip lies flat.
- Explain why the leaf must stay wet throughout, and what happens to the cells if the mount is allowed to dry.
Identification of plant cell structures
- Identify the cell wall, the chloroplasts, the central vacuole and — on the stained slide — the nucleus, and state the function of each.
- Describe the arrangement of the cells in the tissue and relate that brick-like geometry to the presence of a rigid wall.
Use of a biological stain
- Compare the water mount and the Lugol mount directly, and say precisely which structure the stain reveals and which structures were already visible without it.
Observation and recording
- Save a microscope image at each magnification for both slides, annotate the 400× stained view, and estimate cell dimensions from the known field of view rather than guessing.
Protocol
Preparation
- Turn on the microscope by pressing the switch on the front of the device. You will turn on the illuminator, so that the transmitted light passes through the sample from below, which is ideal for transparent specimens.
- Fill the small beaker completely with cold tap water.
- Place two clean slides on your work area.
Preparation of the first slide
- Using tweezers, gently place a small Elodea leaf on the first slide.
- Place a drop of water on the first slide.
- Cover the slide with a coverslip.
- Carefully blot the excess water with absorbent paper.
Preparation of the second slide
- Using tweezers, gently place a small Elodea leaf on the second slide.
- Place a drop of Lugol’s on the second slide.
- Cover the slide with coverslip.
- Carefully blot the excess water with absorbent paper.
Observation of the first slide
- Place the slide on the microscope stage.
- Click the « Microscope » button on the tablet to view the microscope image.
- You can save an image of the observed microscope view by clicking the « Save image « button located in the lower left area of the « Microscope « section.
Microscope adjustment
- Adjust the magnification by touching the microscope objectives. Begin observation at a magnification of 40x (red objective – labeled Plan 4/0.10).
- Refine the focus with the coarse adjustment knobs located on the left and right of the microscope. Use the coarse knobs only at this magnification.
- Gradually increase the magnification from 40x to 100x (yellow objective – labeled Plan 10/0.25), then to 400x (blue objective – labeled Plan 40/0.65), refocusing each time with the fine adjustment knob only. At these magnifications the coarse knob can drive the objective into the slide.
Note: A magnification of 1000x (white objective – labeled Plan 100/1.25) requires the use of oil between the objective and the coverslip. We therefore do not use this objective in this laboratory.
Observation of the second slide
- Replace the first slide with the second slide containing the Elodea leaf the Lugol’s.
- Observe at 400x magnification (blue objective – labeled Plan 40/0.65) to identify a cell nucleus, which should appear colored yellow by the Lugol’s.
- Recording observations : Document or record the important observations.
Turning off the microscope
- Turn off the microscope by pressing the switch on the front of the device.
Anticipated Outcomes
A set of reference images of the expected microscope views is available in this document (PDF).
| Objective | Total magnification | Unstained slide (water) | Stained slide (Lugol) |
|---|---|---|---|
| Plan 4 / 0.10 (red) | 40× | The outline of the leaf against a bright field, uniformly green. Individual cells are not yet separable. | The same outline, its green now shifted towards olive and yellow-brown by the iodine. |
| Plan 10 / 0.25 (yellow) | 100× | The cellular structure appears: rows of rectangular cells packed edge to edge in a regular brick-like grid, each outlined by its wall and filled with bright green granules. | The same grid, with the walls standing out as sharp dark lines and the interior of each cell darkened. |
| Plan 40 / 0.65 (blue) | 400× | Individual chloroplasts resolve as discrete green discs crowded against the wall, with a clear unpigmented space — the central vacuole — occupying the middle of the cell. The nucleus is not reliably identifiable. | Walls, chloroplasts and a nucleus visible as a rounded yellow-brown body against the cell periphery. This is the view to record and annotate. |
What the cells look like, and why
The single fact that explains almost every observation is the cell wall. A layer of cellulose 0.1–1 µm thick surrounds each cell, is stiff enough to resist deformation, and is cemented to its neighbours. Cells therefore cannot round off, slide past one another, or overlap: they hold a fixed rectangular shape and tile the leaf in orderly files. Elodea leaf cells are roughly 50–100 µm long and 20–30 µm wide, so at 400× only a handful fill the field — large enough that the arrangement, not just the individual cell, becomes the object of study.
The wall also explains the vacuole. Because the wall can withstand pressure, the cell is free to take up water osmotically until its contents press outward against the wall at a turgor pressure of several hundred kilopascals. The water is held in one large central vacuole, which in a mature cell occupies 80–90 % of the volume and squeezes the cytoplasm, the chloroplasts and the nucleus into a thin peripheral layer. That is why the chloroplasts appear as a rim rather than a filled disc, and why the centre of each cell looks empty. An animal cell placed in the same water would swell and burst, having no wall to push back — the direct link to laboratory 004 on osmosis.
The chloroplasts are visible without any stain because they already contain one. Chlorophyll absorbs strongly in the red and the blue and transmits in the green, so each chloroplast — a lens-shaped organelle about 5 µm across — removes enough light from the beam to register as a distinct green body. A typical Elodea cell holds several dozen. They are also mobile, drifting slowly with the cytoplasm, which is one of the few living processes observable in a light microscope.
Magnification, resolution and field of view
Total magnification is the product of objective and eyepiece: with the standard 10× eyepiece, M = Mobj × Meye gives 4 × 10 = 40×, 10 × 10 = 100× and 40 × 10 = 400×. What can be separated at all is set instead by the numerical aperture printed after each objective’s power. By the Abbe criterion d = λ / (2 × NA); for green light at λ = 550 nm the red objective gives d = 550 nm ÷ (2 × 0.10) = 2.8 µm, the yellow 1.1 µm, and the blue 550 nm ÷ (2 × 0.65) = 0.42 µm. A 5 µm chloroplast is therefore resolvable by all three, which matches the observation that the green granules are visible from 100×; the excluded 100× oil objective (NA 1.25) would reach 0.22 µm, but only with immersion oil to carry the high-angle rays across the gap.
Field of view narrows in proportion to objective power. For an eyepiece of field number 18 mm the visible diameter is 18 ÷ 4 = 4.5 mm at the red objective, 1.8 mm at the yellow one and 18 ÷ 40 = 0.45 mm, or 450 µm, at the blue one. That gives a way to size the cells without a graticule: a 400× field 450 µm across spanned by about six cells end to end puts each cell near 75 µm long, inside the expected range. Depth of field falls faster still, from tens of micrometres at 40× to under a micrometre at 400×, which is why the coarse knob is restricted to low power — at 400× the objective sits a fraction of a millimetre above the coverslip and a coarse movement drives glass into glass.
Summary of Assignment by Grade Range
Grade 9–10
- Focus — operating the microscope safely and identifying the parts of a plant cell, with the vocabulary that goes with them: objective, eyepiece, stage, coarse and fine focus, wet mount, coverslip, stain, cell wall, chloroplast, vacuole, nucleus.
- Activities — prepare both slides, observe each at 40×, 100× and 400×, and save the six images. Draw the 400× stained view and label the cell wall, a chloroplast, the central vacuole and the nucleus. Answer the guided questions: what colour are the chloroplasts and why can they be seen without any stain? Which single structure did the Lugol’s solution reveal? Why are the cells arranged in neat rows rather than piled at random?
Grade 11
- Focus — quantifying the observation and linking each structure to its function.
- Activities — calculate the total magnification of each objective with a 10× eyepiece; use the field of view (18 mm ÷ objective power) to estimate the length and width of a cell and the diameter of a chloroplast, and compare with the accepted 50–100 µm, 20–30 µm and 5 µm; explain how the cell wall accounts for both the rectangular shape and the tiled arrangement; explain why the chloroplasts form a rim around an apparently empty centre, naming the structure responsible; and build a side-by-side comparison table with the buccal cells of laboratory 024, listing every structure present in one and absent in the other.
Grade 12 / College Level
- Focus — the optics that bound the instrument, the physical chemistry of turgor, and the selectivity of the stain.
- Activities — compute the Abbe limit d = λ / (2 × NA) for all four objectives, including the excluded 100×/1.25, and explain what immersion oil does to the numerical aperture and why the objective is unusable without it; distinguish resolution from contrast and use the distinction to explain why chloroplasts need no stain while the nucleus does; relate the central vacuole to water potential and turgor pressure, predicting what would be seen after mounting the leaf in concentrated salt solution instead of water and naming the result; account for the chemistry of Lugol’s solution (triiodide formation, affinity for protein and nucleic acid, and the separate blue-black reaction with starch) and predict how the stained view would differ between a leaf kept in bright light and one kept in darkness for 48 hours; and design a control that would distinguish a genuine cell wall from the rim of a trapped air bubble.
Laboratory essentials
Instruments
- Compound light microscope with transmitted illuminator and objectives Plan 4/0.10, Plan 10/0.25 and Plan 40/0.65 with a 10× eyepiece — 40×, 100× and 400× total (the Plan 100/1.25 oil objective is not used)
- 2 microscope slides
- 2 coverslips
- Tweezers (for handling the leaves and the coverslips)
- Droppers
- Beaker (50 mL), filled with water
- Absorbent paper
Products
- Waterweed (Elodea) leaves in suspension — one small leaf per slide
- Water (1 drop, first slide)
- Lugol’s solution 2% (1 drop, second slide)