

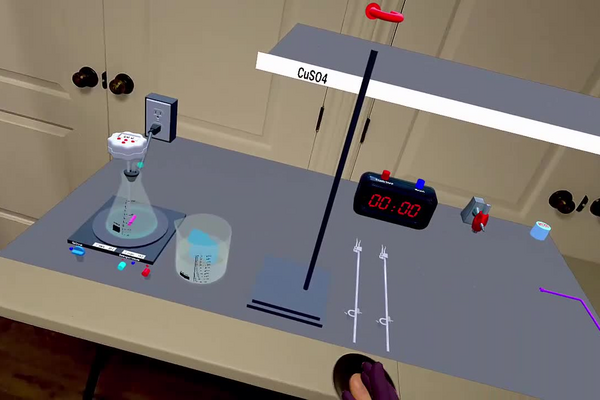
Distillation is the workhorse separation technique of the chemical world. Refineries use it on a colossal scale to split crude oil into fuels, desalination plants use it to win fresh water from the sea, and distillers of every tradition have used it for centuries to concentrate alcohol. Wherever two components of a liquid mixture differ in how readily they vaporise, distillation can pull them apart.
The principle is a difference in boiling points. When a solution of a non-volatile solid is heated, only the solvent boils: its molecules escape as vapour while the dissolved solid, whose own boiling point lies hundreds of degrees higher, stays behind. Led away and cooled, the vapour condenses back into liquid — now free of the solute it left in the flask. Heating drives the phase change from liquid to gas; cooling reverses it; and the solute, unable to make either journey, is separated from its solvent.
In this laboratory you will separate a copper sulfate solution into its two constituents: the water will be boiled off, condensed in a test tube chilled by an ice bath, and recovered as distillate, while the copper sulfate remains in the Erlenmeyer flask as a solid residue. You will assemble the full apparatus yourself, control the heating, and watch both halves of the separation happen at once.
Educational Goals
Familiarization with the laboratory environment
- Identify the layout and equipment of the distillation laboratory, including the hot plate with magnetic stirrer, the lab stand with its clamps, the graduated cylinder, the thermometer, the stopwatch and the ice bath.
Assembly of a distillation apparatus
- Set up the complete vapour path — stoppered Erlenmeyer flask, glass elbow, connector and chilled collection tube — and explain the role of each part.
- Position clamps at the prescribed heights so the collection tube sits in the ice bath and the connector bridges to the flask.
Controlled heating of a solution
- Set the hot plate target temperature and monitor the thermometer and results table as the solution approaches the boiling point.
- Keep the temperature within 5 °C of the boiling point of water, and explain why overheating risks decomposing the solute.
- Use the magnetic stirrer to keep the solution mixed and the boiling smooth.
Mastery of the vocabulary of distillation
- Use the terms solvent, solute, vapour, condensation, distillate and residue correctly, attaching each to the thing observed in the experiment.
Understanding the physics of the separation
- Explain the separation in terms of the difference in volatility between water and an ionic solid.
- Describe the two phase changes involved and where in the apparatus each one happens.
Protocol
- Using the 70 mL graduated cylinder, measure approximately 60 mL of 1M copper sulfate (CuSO4) solution.
- Pour the measured liquid into the 250 mL Erlenmeyer flask.
- Insert a magnetic stir bar into the Erlenmeyer flask.
- Close the Erlenmeyer flask with the two-hole rubber stopper including the glass elbow.
- Place the Erlenmeyer flask on the hot plate.
- Insert the thermometer into the hole of the stopper with a glass elbow.
- Half-fill the 500 mL beaker that contains the ice with cold tap water.
- Place the beaker to the right of the hot plate.
- Attach a universal clamp to the stand, above the ice beaker, at a height of approximately 15 cm (bottom position).
- Attach the empty test tube to the clamp so that the test tube will be positioned in the beaker of ice.
- Attach the other universal clamp to the support, at a height of approximately 30 cm (top position).
- Attach the purple connector to the top clamp, which will allow a connection between the test tube and the Erlenmeyer flask.
- Start the magnetic stirrer.
- Start the stopwatch.
- Set the hot plate to 105°C.
- Check that the boiling point of water (100°C) is reached on the thermometer, as well as in the results table.
Note that in this experiment, the boiling speed of water is multiplied by 2.
- Heat without exceeding the boiling point of water by more than 5 degrees °C and ensure not to burn the solute.
After reaching the temperature of 100°C, a delay between 45 and 60 seconds is to be expected before the start of the boiling reaction.
- When almost all the solvent has evaporated and a blue solid residue is visible, turn off the stirrer and reduce the target temperature of the heating plate to 15°C.
- The content of the test tube is the solvent and is now called the distillate.
- The content of the Erlenmeyer flask is the solute.
Anticipated Outcomes
Expected results. The solution separates into a solid residue in the Erlenmeyer flask and a clear, colourless distillate in the collection tube.
| Quantity | Expected value |
|---|---|
| Solution distilled | 60 mL of 1 M CuSO4 |
| Amount of copper sulfate in the flask | 0.060 mol |
| Residue if recovered as pentahydrate, CuSO4·5H2O | 15.0 g (blue) |
| Residue if recovered as the anhydrous salt, CuSO4 | 9.6 g (white to grey-green) |
| Distillate | water, collected in the chilled test tube |
Why only the water leaves the flask. At atmospheric pressure water boils at 100 °C. Copper sulfate, by contrast, is an ionic solid held together by strong electrostatic forces: it has no boiling point anywhere near this temperature, and decomposes rather than boils when heated strongly. At 105 °C the vapour rising from the flask is therefore essentially pure water; the Cu2+ and SO42− ions cannot follow. The amount of solute is fixed by the makeup of the solution: n = C × V = 1.0 mol/L × 0.060 L = 0.060 mol.
Why the vapour condenses in the test tube. The water vapour carries its heat of vaporisation with it. When it reaches the collection tube sitting in the ice bath, that energy is drained away into the cold surroundings and the vapour returns to liquid — the same phase change run in reverse. The condensed liquid is called the distillate: it is water recovered from the solution, leaving its former solute behind.
Why the heating must be gentle. Two reasons. First, the target of 105 °C — only just above the boiling point — keeps the water boiling steadily without overheating the solid left behind as the liquid disappears; an overheated residue chars or decomposes, which the protocol warns against as burning the solute. Second, as water is removed the remaining solution grows more concentrated, and its boiling point creeps slightly above 100 °C — a colligative effect — so a small margin above 100 °C is genuinely needed to keep the distillation going. The 45–60 second pause after the thermometer first reads 100 °C reflects the extra heat needed to bring the whole volume, not just the sensor’s surroundings, to the boil.
Summary of Assignment by Grade Range
Grade 9–10
- Focus: a dissolved solid and its solvent can be separated by boiling point, and each recovered fraction has a name.
- Activities: assemble the apparatus following the protocol and run the distillation safely; observe where evaporation and condensation each occur and point to them in the apparatus; name the distillate and the residue and state which constituent of the original solution each one is; record when boiling begins and when the residue first becomes visible.
Grade 11
- Focus: the quantitative side of the separation and the phase changes that drive it.
- Activities: calculate the amount of copper sulfate in the flask from the concentration and volume; predict the residue mass for the anhydrous salt and for the pentahydrate using their molar masses; explain why the vapour is pure water in terms of volatility; explain why the boiling point of the solution rises as the distillation proceeds.
Grade 12 / College Level
- Focus: hydrates, energy accounting and the evaluation of a separation.
- Activities: use the observed colour and mass of the residue to infer its hydration state, and propose heating to constant mass as the test that would settle it; estimate the energy required to vaporise the water using the heat of vaporisation; account for the mass that fails to appear in either recovered fraction; compare distillation with evaporation to dryness and justify when the extra apparatus is worth it.
Laboratory essentials
Instruments
- Beaker (50 mL and 500 mL)
- Erlenmeyer (250 mL)
- Graduated Cylinders (70 mL)
- Hot plate
- Lab Stand & Clamps
- Magnetic stirrer
- Plastic connector
- Test tubes
- Thermometer
- Stopwatch
- Glass elbow
Products
- Copper sulfate 1M solution