

Blood typing is one of the oldest and most consequential routine tests in medicine. Karl Landsteiner identified the ABO groups in 1901 after noticing that blood from some people clumped when mixed with blood from others, and the Rh factor was described four decades later. Together the two systems decide whether a transfusion saves a life or destroys the recipient’s red cells within minutes, and they are checked before every transfusion, in every pregnancy, and in forensic and paternity work.
The test rests on a single molecular idea. The surface of a red blood cell carries inherited sugar and protein markers called antigens: the A antigen, the B antigen, both, or neither, and separately the Rh (D) antigen. A serum containing antibodies against one of these markers — an agglutinin — has two or more binding sites, so when it meets cells carrying its target antigen it bridges them together into visible clumps. This is agglutination: the drop loses its smooth, even red appearance and becomes grainy, with darker specks in a clearing fluid. When the antigen is absent the antibody has nothing to bind, and the drop stays uniform. The test is therefore read as a simple yes or no, three times over.
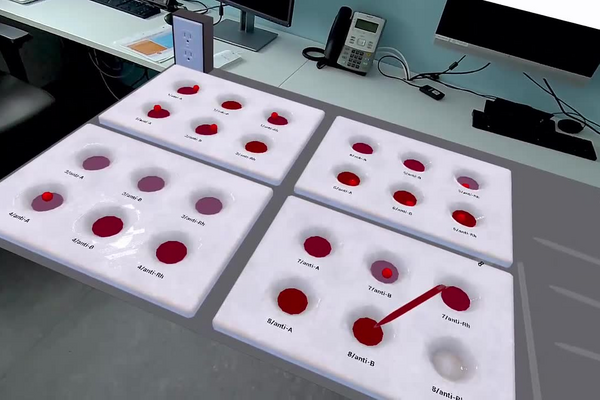
In this laboratory you will type eight unknown blood samples. Each sample is placed in three separate wells and challenged with anti-A, anti-B and anti-Rh serum in turn, mixing each well with a glass rod that is rinsed and dried between wells so that no serum is carried from one test into the next. From the pattern of three yes-or-no answers you will deduce the ABO group and the Rh status of every sample, and then work out which of them could safely donate to which.
Educational Goals
Familiarization with the laboratory environment
- Locate the well plates and their labelling scheme, the three serum droppers, the glass rod, the distilled water and the absorbent paper, and understand why each sample needs three wells rather than one.
Handling biological samples safely
- Treat every blood sample as potentially infectious: wear gloves and eye protection, avoid contact with skin, and dispose of contaminated material as biohazardous waste rather than ordinary rubbish.
Avoiding cross-contamination
- Rinse and dry the glass rod between every mixing operation, and explain what a false positive would look like if serum were carried from an anti-A well into an anti-B well.
- Add serum to blood without touching the dropper tip to the well, so that the stock serum is never contaminated in return.
Reading an agglutination reaction
- Distinguish a genuinely agglutinated drop — grainy, clumped, with visible aggregates against a clearer background — from an unreacted drop that remains smooth and evenly coloured.
- Record each of the twenty-four observations as a positive or a negative before attempting any interpretation.
Determining ABO group and Rh status
- Convert a pattern of three results into a blood group, and state which antigens are present on the cells and which antibodies are therefore present in the plasma.
Reasoning about transfusion compatibility
- Use the typing results to predict which donor–recipient pairs are safe, and explain in antigen–antibody terms why group O Rh− is the universal red-cell donor and group AB Rh+ the universal recipient.
Protocol
- Place 5 drops of blood sample 1 into each of the 3 wells identified as follows:
- well 1 (anti_A)
- well 1 (anti_B)
- well 1 (anti_Rh)
- Place 2 drops of anti-A agglutinin into well identified 1 (1/anti-A).
- Mix immediately using a clean glass rod.
- Place 2 drops of anti-B agglutinin into well identified 1 (1/anti-B).
- Mix immediately using a clean glass rod.
- Place 2 drops of anti-Rh agglutinin into well identified 1 (1/anti-Rh).
- Mix immediately using a clean glass rod.
- Rinse the glass rod with distilled water.
- Dry the glass rod using absorbent paper.
- Repeat the steps for blood samples 2, 3, 4, 5, 6, 7, and 8.
Anticipated Outcomes
| Blood sample | anti-A | anti-B | anti-Rh | Blood group |
|---|---|---|---|---|
| 1 | Agglutination | — | Agglutination | A Rh+ (A+) |
| 2 | Agglutination | Agglutination | — | AB Rh− (AB−) |
| 3 | — | — | — | O Rh− (O−) |
| 4 | Agglutination | — | — | A Rh− (A−) |
| 5 | — | — | Agglutination | O Rh+ (O+) |
| 6 | Agglutination | Agglutination | Agglutination | AB Rh+ (AB+) |
| 7 | — | Agglutination | — | B Rh− (B−) |
| 8 | — | Agglutination | Agglutination | B Rh+ (B+) |
How the pattern is read
Each well answers one question: is this antigen on the cells? Agglutination with anti-A means the A antigen is present, agglutination with anti-B means the B antigen is present, and the ABO group follows directly — A alone gives group A, B alone gives group B, both give group AB, neither gives group O. The third well is read independently of the first two: agglutination with anti-Rh means the cells carry the D antigen and the sample is Rh positive, no agglutination means Rh negative. Sample 3 is the only one that gives three negatives, and it is the only O Rh−; sample 6 is the only one that gives three positives, and it is the only AB Rh+.
Why the clumps form
The anti-A and anti-B agglutinins are IgM antibodies, large pentameric molecules with ten antigen-binding sites. A single IgM molecule can therefore bind several red cells at once, and a few thousand of them turn a smooth suspension into a lattice of bridged cells within seconds. This is why the ABO reaction is read at room temperature with the naked eye and needs no incubation. Anti-D is typically IgG, with only two binding sites, so in a clinical laboratory the Rh test often requires a longer reaction or an added reagent; here it is read the same way as the others.
The ABO antibodies are also unusual in being present without prior exposure to human blood. A group A person carries anti-B in plasma from infancy, almost certainly raised against the very similar sugar structures on gut bacteria. Every individual therefore has antibodies against exactly those ABO antigens their own cells lack — the rule that makes ABO mismatch so immediately dangerous.
Consequences for transfusion
| Group | Antigens on the red cells | Antibodies in the plasma | Can receive red cells from |
|---|---|---|---|
| A | A | anti-B | A, O |
| B | B | anti-A | B, O |
| AB | A and B | none | A, B, AB, O |
| O | none | anti-A and anti-B | O |
Rh adds a second, asymmetric constraint. An Rh− recipient who receives Rh+ cells does not react on first exposure, because anti-D is not naturally present, but the immune system is sensitised and a later Rh+ transfusion can provoke severe haemolysis. The same mechanism underlies haemolytic disease of the newborn: an Rh− mother carrying an Rh+ fetus may produce anti-D that crosses the placenta in a subsequent pregnancy, which is why prophylactic anti-D immunoglobulin is given. Of the eight samples here, 2, 3, 4 and 7 are Rh negative and would need Rh− blood.
Summary of Assignment by Grade Range
Grade 9–10
- Focus — careful observation and the vocabulary of the test: antigen, antibody, agglutinin, agglutination, ABO group, Rh factor, donor, recipient.
- Activities — type all eight samples, record each of the twenty-four wells as positive or negative in a results grid, then name the group of each sample from its pattern. Answer the guided questions: which sample gave no reaction at all, and what does that tell you about its red cells? Why must the glass rod be rinsed between wells?
Grade 11
- Focus — moving from the observation to the underlying immunology, and using the results to make predictions.
- Activities — for each of the eight samples, state the antigens on the cells and the ABO antibodies in the plasma; build the full donor–recipient compatibility grid for the eight samples and identify every safe pairing; explain why sample 3 can donate red cells to all seven others while sample 6 can donate to none of them; and explain why the Rh test must be read separately from the ABO tests rather than combined with them.
Grade 12 / College Level
- Focus — the genetics and the antibody chemistry.
- Activities — work out the possible ABO genotypes behind each observed phenotype (iAiA or iAi for group A, and so on) and explain why AB is codominant while O is recessive; account for the difference between IgM and IgG in terms of valency and why that changes how the anti-D result is obtained clinically; design a reverse-typing check that would confirm each of the eight results and state what a discrepancy between forward and reverse typing would imply; and explain the mechanism and timing of anti-D prophylaxis in an Rh− mother, using samples 2, 3, 4 and 7 as worked cases.
Laboratory essentials
Instruments
- Well plates (three wells per blood sample, labelled anti-A, anti-B and anti-Rh)
- Droppers, one per serum
- Glass rod (for mixing)
- Absorbent paper
- Gloves and eye protection
Products
- 8 blood samples of unknown group (5 drops of each per well)
- Anti-A agglutinin serum (2 drops per test)
- Anti-B agglutinin serum (2 drops per test)
- Anti-Rh agglutinin serum (2 drops per test)
- Distilled water (for rinsing the glass rod)