

Every element, when its atoms are given enough energy, emits light at a set of wavelengths that belongs to it alone. That fact underpins a surprising amount of modern science: it is how the composition of stars is determined without leaving Earth, how helium was discovered in the Sun’s spectrum decades before it was found on our own planet, and how metal contamination is measured in drinking water and industrial effluent today.
The flame test is the oldest and simplest application of the principle. Heating a metal salt in a burner flame supplies energy to the metal’s outermost electrons, lifting them into higher-energy orbitals. The excited state is unstable, and within nanoseconds the electron falls back, releasing the energy difference as a single photon. Because the allowed energy levels of an atom are fixed and characteristic, the photon’s energy — and therefore the colour of the light — is a signature of the element that produced it.
In this laboratory you will heat four unidentified substances in turn and identify each from the colour it imparts to the flame. The test is quick, requires almost no equipment, and for a handful of metals it is completely conclusive. You will also meet its limitations, which are as instructive as its successes.
Educational Goals
Familiarization with the laboratory environment
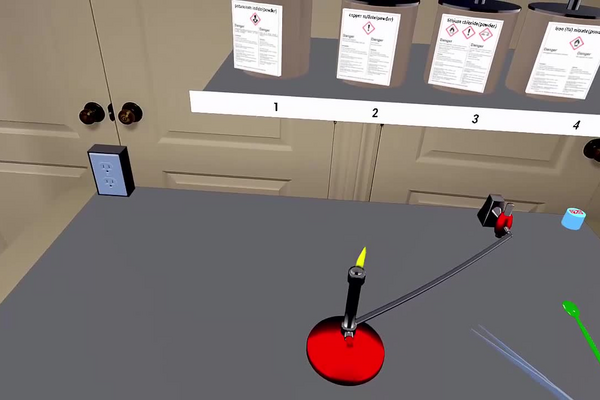
- Identify the layout and equipment of the flame-test laboratory, including the Bunsen burner and its ignition control, the numbered substance positions, and the spatulas and tweezers used to transfer samples.
Use of protective equipment and safe handling of an open flame
- Wear safety goggles and a lab coat, and recognise the hazard pictograms on each reagent bottle before handling it.
- Understand why a sample is introduced to the flame on a spatula or with tweezers rather than by hand, and why only a small quantity is used.
Correct execution of a flame test
- Light the burner, load a small sample of the substance, and introduce it to the hottest part of the flame.
- Observe and describe the colour produced immediately, since flame colours are transient and fade as the sample is consumed.
Interpreting an emission colour as evidence
- Match an observed colour against a reference set to identify the metal present.
- Distinguish a confident identification from an ambiguous one, and state which pairs of elements this test cannot separate.
Connecting colour to atomic structure
- Explain the emission of light in terms of electrons being excited and returning to lower energy levels, and relate the colour observed to the size of the energy gap involved.
Recognising the limits of a qualitative method
- Explain why the test identifies the metal but says nothing about the anion, and why a strong emitter can mask a weaker one in a mixture.
Protocol
Method for testing a substance’s reaction to flame
- Light the burner using the red button at the base of the tube.
- Take a sample powder from a substance to be tested with the spatula (substances 1 to 4).
- Expose the substance to the burner flame.
- Take a strip of magnesium using the tweezers (substance 5).
- Expose the magnesium ribbon to the burner flame.
- Turn off the burner.
- The color of the flame is found in the table; in the results section.
- Compare the color of the flame with the reference colors, such as those presented below.
The color emitted during the combustion of certain substances
White = Magnesium
Violet = Potassium iodide
Green = Copper sulfate
Gold-orange = Iron nitrate
Bright red = Lithium chloride
Anticipated Outcomes
Expected flame colours. The table below lists the five substances stocked in this laboratory and what each should show when introduced to the flame.
| Substance | Metal | Expected flame colour | Principal emission |
|---|---|---|---|
| Lithium chloride | Li+ | crimson red | 670.8 nm (1.85 eV) |
| Potassium iodide | K+ | pale lilac to violet | 766.5 / 769.9 nm (1.62 eV) |
| Copper sulfate | Cu2+ | green to blue-green | ≈ 515 nm (2.41 eV) |
| Iron nitrate | Fe3+ | gold-orange sparks | many closely spaced lines across the visible spectrum |
| Magnesium | Mg | brilliant white flash | continuous emission from burning metal |
Why a flame produces a colour at all. An atom’s electrons may occupy only certain discrete energy levels. Thermal energy from the flame promotes an outer electron from its ground state to a higher level; the atom is then said to be excited. That state persists for only a few nanoseconds before the electron drops back, and the energy difference is carried away as a single photon: ΔE = Eupper − Elower = hν = hc/λ, where h = 6.626 × 10⁻³⁴ J·s, c = 2.998 × 10⁸ m/s, ν is the frequency and λ the wavelength. Rearranged for the quantity actually observed: λ = hc/ΔE.
A worked example. Sodium’s characteristic emission is at 589 nm. The energy of one such photon is ΔE = (6.626 × 10−34 × 2.998 × 108) / (589 × 10−9) = 3.37 × 10⁻¹⁹ J, which is 2.10 eV when divided by 1.602 × 10⁻¹⁹ J/eV. This corresponds to the 3p → 3s transition of the sodium atom. Because that energy gap is a fixed property of sodium, the wavelength is fixed too, and the yellow is reproducible to a fraction of a nanometre — which is precisely what makes the method analytically useful.
Why the colours differ between elements. Each element has its own arrangement of energy levels, set by its nuclear charge and by how its electrons shield one another. A larger gap between the levels involved gives a more energetic photon and therefore a shorter wavelength, shifted toward blue; a smaller gap gives a longer wavelength, shifted toward red. Potassium’s outer electron is the most weakly held of the metals in this laboratory, so it produces the lowest-energy photon at 766 nm; copper’s transition involves a much larger gap and emits in the green.
Two substances that break the pattern. Iron does not show a single clean colour: it emits a very large number of closely spaced lines across the visible spectrum, which the eye integrates into gold-orange sparks. Magnesium is different again — the metal itself burns, and the brilliant white light comes from the glowing magnesium oxide produced, a continuous thermal emission spanning the whole visible range rather than a set of discrete lines. Both are identifiable, but by the character of the light rather than by its hue.
Why sodium is a nuisance. The sodium emission is exceptionally intense, and sodium is present as a trace contaminant almost everywhere — in glassware, in dust, on skin. A faint yellow tinge therefore appears in many flames whether or not sodium is the substance under test, and it can completely mask potassium’s much weaker lilac. In a professional laboratory the classic remedy is to view the flame through cobalt-blue glass, which absorbs the yellow and lets the violet through.
Summary of Assignment by Grade Range
Grade 9–10
- Focus: elements can be identified by the colour they give a flame, and observations must be recorded promptly and honestly.
- Activities: light the burner safely and follow the handling rules for each labelled substance; test each unknown and record the colour seen in a table; identify each substance by comparing against the reference colours; note any case where the colour was ambiguous and say why.
Grade 11
- Focus: light as evidence of electron behaviour, and the relationship between colour and energy.
- Activities: place each observed colour on the visible spectrum and rank the unknowns by photon energy; use ΔE = hc/λ to calculate the photon energy for a given wavelength; explain why lithium chloride and lithium sulfate give an identical flame; explain why a yellow tinge may appear in a flame that contains no sodium salt.
Grade 12 / College Level
- Focus: quantisation, and the limits of a qualitative analytical method.
- Activities: explain the discrete nature of emission in terms of quantised energy levels, and state what a continuous spectrum would imply instead; calculate the wavelength expected from a stated energy gap and compare it with the observed colour; account for the trend in emission wavelength across lithium, sodium and potassium in terms of nuclear charge and shielding; assess the reliability of the method for a mixture of two metals and specify what instrumentation would be required to resolve them.
Laboratory essentials
Instruments
- Bunsen burner
- Spatulas
- Tweezers
- Safety goggles
- Lab coat
Products
- Copper sulfate (powder)
- Iron nitrate (crystals)
- Lithium chloride (powder)
- Magnesium (pieces)
- Potassium iodide (powder)