

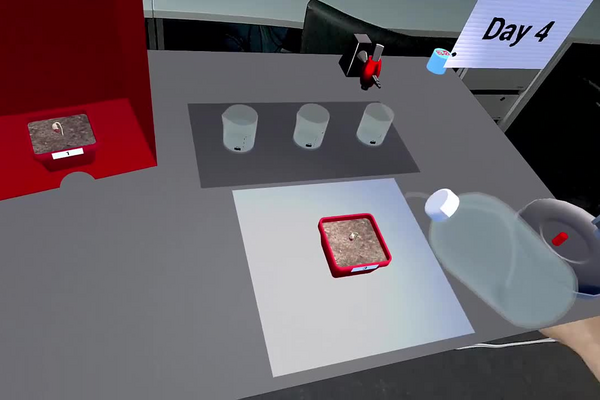
Germination is the point at which a dry, dormant seed becomes a living plant. Water taken up by imbibition reactivates the seed’s metabolism, enzymes break down the starch and protein stored in the cotyledons, the radicle emerges and anchors the seedling, and the shoot pushes up towards the surface. None of that requires light: a seed germinates perfectly well in the dark, on the reserves packed into it. What does require light is the next step. Chlorophyll cannot be assembled in darkness, so a seedling that reaches the air without light stays pale, keeps its stem bent in a protective hook, and never opens its leaves; it lives on its reserves until they run out. Given light, the hook straightens, the cotyledons and first leaves expand and turn green, and the plant switches from consuming its reserves to making its own sugar by photosynthesis. Seed companies, growers and greenhouse operators depend on knowing exactly how much light a seedling needs to make that transition, and how quickly. In this laboratory you will soften three bean seeds in water, plant them in three identical numbered pots, and then place each pot in a different light environment: pot 1 inside a closed shoe box, pot 2 on the counter beside the sink in ordinary room light, and pot 3 directly under a switched-on lamp. All three receive the same soil and the same watering. You will then advance the clock by 24 hours at a time and water the plants each day for the equivalent of ten days, photographing all three pots daily, so that light is the only variable separating them.
Educational Goals
Familiarization with the laboratory environment
- Locate and identify the flowerpots, the 50 mL beakers, the wash bottle, the lamp, the shoe box and the clock, and state the part each plays in the experiment.
- Find the picture table on the tablet and understand that it holds one photograph of each pot for each day of the experiment.
Design of a controlled comparison
- Identify light as the independent variable and name what is deliberately held constant: the same seed type, the same soil, the same pot, the same volume of water on the same schedule, and the same temperature.
- Explain why the three pots have to be treated identically in every other respect for any difference between them to mean anything.
Seed preparation and planting
- Soak one bean in each of three 50 mL beakers filled halfway with tap water, and explain why softening the seed coat speeds germination.
- Plant the soaked seeds in the numbered pots and keep track of which seed is in which pot for the whole ten days.
Daily maintenance and control of time
- Water all three pots with the wash bottle each day, giving each the same amount.
- Advance the clock by 24 hours and repeat the cycle, so that the ten-day sequence is complete and unbroken.
Observation and record keeping
- Record, for each pot on each day, whether the shoot has emerged, its approximate height, its colour, and whether the hook has opened and leaves have expanded.
- Use the daily photographs to pin down the day on which each stage occurred rather than relying on memory at the end.
Interpretation of the result
- Distinguish germination, which happens in all three pots, from subsequent growth and greening, which do not.
- Relate the appearance of each seedling to the light available to it, and state what the experiment can and cannot prove with one plant per condition.
Protocol
The preparation and the observation
- Place one bean seed into each of the three 50 mL beakers.
- Fill each 50 mL beaker halfway with tap water to soften the bean seeds.
- Plant the bean seeds in the flowerpots numbered 1 to 3 (to pick them up, place your open hand facing upward at the base of the beaker).
- Using the wash bottle, water the bean plants numbered from 1 to 3.
- Place bean plant 1 in the shoebox, bean plant 2 on the counter next to the sink, and bean plant 3 should be under the lamp lighting.
- Turn on the lamp.
- You must wait a few days to observe the germination of the bean plant depending on watering and light conditions.
- Click on the red button of the clock to advance time by 24h.
- Water each of the three plants using the washing bottle.
- Repeat the step of advancing time by 24 hours and watering the three plants (steps 8 and 9) and observe the evolution of the bean plant until the equivalent of a 10-day period has elapsed.
- Observe the evolution of bean plant germination in relation to light exposure over the days.
- The results are found in the tablet’s table.
Anticipated Outcomes
Results are found following this link (PDF)
All three seeds germinate. What separates them is everything that happens after the shoot reaches the air. The table below gives the state of each pot at the end of the ten-day sequence, as recorded in the simulation’s daily photographs.
| Pot | Position | Light received | State on day 10 |
|---|---|---|---|
| 1 | Inside the closed shoe box | None, apart from the moments the box is opened for watering | Germinated. The shoot is cream to pale yellow with no trace of green, the hypocotyl is still bent into its hook, and no leaves have expanded |
| 2 | On the counter next to the sink | Ordinary room lighting, indirect | Germinated and greened. The stem is upright, the hook has opened and narrow green leaves are held clear of the soil; the spent cotyledon is visible on the surface |
| 3 | Directly under the lamp, lamp switched on | Strong continuous artificial light at close range | Germinated, greened, and the most developed of the three: a thicker upright stem carrying the largest and widest leaf area |
The daily photographs also let the sequence of germination itself be dated. A bean is an epigeal germinator, so the stages come in a fixed order, and the same order appears in all three pots even though only two of them go on to develop leaves.
| Stage | What is visible | What is happening inside |
|---|---|---|
| Imbibition | The soaked seed is visibly swollen and its coat is wrinkled or split | Water enters the seed, the tissues rehydrate and metabolism restarts; enzymes begin breaking stored starch down into sugars |
| Emergence of the radicle | Nothing above the soil yet | The primary root grows downward first, anchoring the seedling and taking up water before the shoot commits itself |
| The hypocotyl arch | A pale bent loop of stem breaks the surface, tip pointing down | The stem elongates in a hook so that the growing tip and the cotyledons are dragged up through the soil rather than pushed through it |
| Cotyledons above ground | Two thick pale seed leaves are lifted clear of the soil | The reserves are now carried in the air; the seedling is still living entirely on them |
| De-etiolation | Only in pots 2 and 3: the hook straightens and everything above ground turns green | Light triggers the last step of chlorophyll synthesis and switches the seedling from its dark growth programme to its light growth programme |
| First true leaves | Only in pots 2 and 3: leaves expand above the cotyledons, which shrivel | Photosynthesis takes over from the reserves; the plant becomes self-supporting, and does so fastest in the brightest pot |
Why light is not needed to germinate but is needed to survive. Germination requires water, oxygen and a suitable temperature, and the energy for it comes from the seed, not from the sun: the cotyledons of a bean are a store of starch, protein and lipid, and amylases hydrolyse that starch into sugars that the growing embryo respires. This is why pot 1 germinates in complete darkness on the same schedule as the other two. The reserves, however, are finite. A seedling only becomes self-sufficient once it can run photosynthesis, 6 CO2 + 6 H2O + light energy → C6H12O6 + 6 O2, and that requires green tissue. The final step in building chlorophyll, the conversion of protochlorophyllide to chlorophyllide, is itself driven by light in flowering plants, so a seedling in the dark physically cannot make the pigment. Pot 1 is therefore not dying of hunger on day 10 — it still has reserves — but it has no route to becoming autotrophic, and left in the box it would exhaust its cotyledons and die.
Two growth programmes, one seedling. A seed in the dark does not simply fail to grow; it follows a different and perfectly sensible programme, called skotomorphogenesis. Stem extension is favoured over leaf expansion, chlorophyll is not made, and the tip is protected inside a hook, because in nature darkness means the seedling is still underground and its only useful move is to reach the surface. The first light it receives is detected by photoreceptors — phytochromes for red and far-red light, cryptochromes for blue — and switches the plant to photomorphogenesis: the hook opens, stem elongation slows, the cotyledons and leaves expand, and chlorophyll accumulates. Pot 1 shows the dark programme, pots 2 and 3 show the light programme, and the difference between pots 2 and 3 shows that the light programme still responds to how much light there is.
Why the lamp beats the counter. The three positions differ by more than one might guess. Indirect indoor lighting on a counter is typically of the order of 100 to 500 lux, a desk lamp at close range gives several thousand lux, and full outdoor daylight runs from about 10 000 lux to more than 100 000 lux. A bean leaf reaches its compensation point — where photosynthesis exactly balances respiration — at a few tens of µmol of photons per m2 per second, and saturates only far above that. Pot 2 is therefore above the threshold at which it can survive and green up, but well below the level at which it grows as fast as it could, while pot 3 is closer to that level, which is why it accumulates the larger leaf area in the same ten days. The ranking of the three pots is the ranking of the light they receive.
Summary of Assignment by Grade Range
Grade 9–10
- Focus: the difference between germinating and growing, and the vocabulary of a controlled comparison.
- Activities: set up the three pots and water them on the same schedule; record colour, height and leaf state for each pot on each day in a table like Table 1; identify the one variable that was changed and list three that were held constant; state which pot did best and which did worst, and explain in a sentence why the pot in the box is pale.
Grade 11
- Focus: quantitative comparison of the three treatments, and the chemistry behind the colour.
- Activities: read heights off the daily photographs and plot height against day for all three pots on one set of axes; explain why chlorophyll cannot be made in the dark and name the pigment stage that light unblocks; account for the hook and for its opening; explain how the seedling in the box stays alive at all, and predict what would happen to it if it were moved under the lamp on day 10; rank the three positions by illuminance and relate the ranking to the growth observed.
Grade 12 / College Level
- Focus: experimental design, and what a single seedling per treatment can and cannot establish.
- Activities: list every variable this protocol leaves uncontrolled and specify the replication, randomisation of pot position and blind scoring that would be needed to turn the demonstration into a measurement; argue for dry mass and leaf area over height as the response variable, and describe how each would be measured; explain etiolation as an adaptive strategy rather than a defect, and distinguish the roles of phytochrome and cryptochrome; design a follow-up experiment that separates the effect of light quantity from light quality, for example a blue-only and a red-only treatment at matched photon flux; and explain why opening the box each day to water pot 1 weakens the dark treatment and how you would avoid it.
Laboratory essentials
Instruments
- Flowerpots (3, numbered 1 to 3)
- Beakers (50 mL, one per seed)
- Wash bottle
- Shoe box
- Lamp
- Clock (advances time by 24 h)
Products
- Bean seeds (3)
- Soil
- Tap water