

Identifying a gas is one of the oldest problems in chemistry, and it is still a live one: mine and tunnel crews test the air before entering, brewers and winemakers monitor the carbon dioxide their fermentations produce, and hospitals verify the contents of every gas line before it reaches a patient. Most gases are colourless and odourless, so appearance is no help — a gas must be identified by how it behaves.
Three classical tests, together, distinguish the most common laboratory gases. A burning splint probes whether the gas is itself flammable: hydrogen ignites with a sharp pop, while carbon dioxide smothers the flame. A glowing splint probes whether the gas supports combustion better than air: only oxygen relights the ember. And limewater — a saturated solution of calcium hydroxide — detects carbon dioxide specifically, turning milky as insoluble calcium carbonate forms. No single test is conclusive on its own, but the pattern of all three results is unique to each gas.
In this laboratory you will apply all three tests to three unknown gases, each supplied in three stoppered test tubes, record the outcome of every trial, and deduce the identity of each gas from the combined evidence.
Educational Goals
Familiarization with the laboratory environment
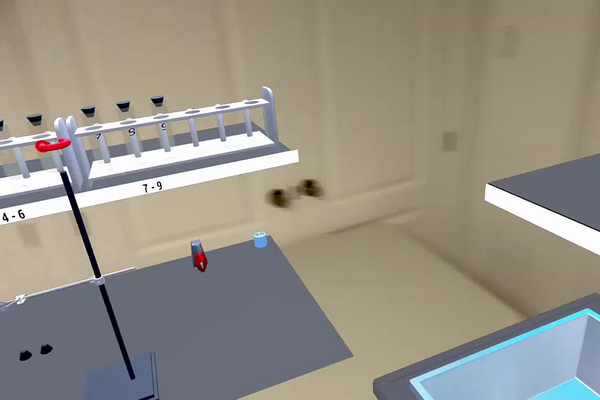
- Identify the layout and equipment of the gas-identification laboratory, including the racked test tubes of unknown gases (#1 to #9), the wooden splints and lighter, the lab stand with its universal clamp, and the graduated cylinder used to measure limewater.
Safe handling of gases and open flames
- Keep test tubes stoppered until the moment of the test, discard used splints in the recovery bin, and understand why only small volumes of gas are handled near a flame.
- Explain why a test tube is clamped upside down for the splint tests: a gas less dense than air, such as hydrogen, would otherwise escape before it could be tested.
Correct execution of the three classical gas tests
- Introduce a burning splint into an inverted tube and interpret a micro-explosion, an extinguished flame, or no change.
- Extinguish a splint while keeping it incandescent, and use the glowing ember to test whether the gas supports combustion.
- Measure 15 mL of limewater, transfer it quickly into a tube of gas, and mix to test for a precipitate.
Systematic observation and deduction
- Record the outcome of every trial immediately in the results table.
- Deduce the identity of each unknown from the combined pattern of the three tests rather than from any single observation.
Connecting observations to chemical properties
- Relate each test to the property it probes: flammability, the ability to support combustion, and the acid–base reaction of carbon dioxide with calcium hydroxide.
- Write and balance the chemical equations behind the pop of hydrogen and the milkiness of limewater.
Protocol
Identification of unknown gases
- Attach a universal clamp to the support.
- Attach upside down one of the test tubes containing unknown gas 1 (test tubes 1 to 3) to the universal clamp.
- Remove the stopper from the inverted test tube.
- Light a wooden splint.
- Insert the burning splint into the inverted test tube.
- A micro explosion, the disappearance, or no change in the flame can provide information about the nature of the gas.
- Place the test tube back on its stand and throw the splint into the recovery bin.
- Attach upside down a second test tube containing unknown gas 1 (test tubes 1 to 3) to the universal clamp.
- Remove the stopper from the inverted test tube.
- Light another wooden splint.
- Shake the wooden splint to extinguish it while keeping it incandescent.
- Insert the glowing splint into the inverted test tube.
- The possible ignition of the splint can provide information about the nature of the gas.
- Place the test tube back on its stand and discard the splint in the recovery bin.
- Pour 15 mL of limewater into the graduated cylinder.
- While keeping it on the test tube rack, open the third test tube containing unknown gas 1 and quickly pour approximately 15 mL of limewater into it.
- Put the cap back on the test tube and mix well.
- The formation or absence of a white precipitate can provide information about the nature of the gas.
- Repeat steps 2 to 17 with the test tubes containing unknown gas 2 (test tubes 4 to 6), then with those containing unknown gas 3 (test tubes 7 to 9).
- Check the results table on the tablet to deduce the contents of the test tubes.
Anticipated Outcomes
Expected results. The three unknowns behave as follows.
| Unknown | Burning splint | Glowing splint | Limewater | Identity |
|---|---|---|---|---|
| Gas #1 (tubes 1–3) | micro-explosion with a sharp “pop” | ember goes out | no change | hydrogen, H2 |
| Gas #2 (tubes 4–6) | flame burns faster and brighter | ember relights | no change | oxygen, O2 |
| Gas #3 (tubes 7–9) | flame is extinguished | ember goes out | turns milky white | carbon dioxide, CO2 |
Why hydrogen pops. Hydrogen is flammable: mixed with the oxygen of the surrounding air and given an ignition source, it burns almost instantaneously — 2H2(g) + O2(g) → 2H2O(g). The reaction is strongly exothermic and propagates through the small volume of gas in a fraction of a second, producing the characteristic squeaky pop of a micro-explosion. The test tube holds only a few millilitres, which is exactly why the demonstration is safe.
Why only oxygen relights the ember. A glowing splint is charcoal oxidising just below the threshold of open flame. In ordinary air, only 21% of the molecules colliding with the ember are oxygen; in pure oxygen that fraction rises to 100%, the rate of oxidation increases roughly in proportion, and the extra heat released pushes the ember back over its ignition temperature. Hydrogen and carbon dioxide contain no free oxygen, so in either gas the ember is starved and goes out.
Why limewater turns milky. Carbon dioxide is an acidic gas. Shaken with limewater — a saturated solution of calcium hydroxide — it reacts to form calcium carbonate: CO2(g) + Ca(OH)2(aq) → CaCO3(s) + H2O(l). Calcium carbonate is almost insoluble, so it appears as a suspension of fine white particles that scatter light and make the liquid look milky. Neither hydrogen nor oxygen reacts with calcium hydroxide, so for those gases the limewater stays clear.
Why the flame goes out in carbon dioxide. Carbon dioxide is the fully oxidised product of combustion: it cannot burn further, and it contains no available oxygen to sustain the splint. Being denser than air, it also lingers in the tube and displaces the air the flame needs — the same principle exploited by CO2 fire extinguishers.
Summary of Assignment by Grade Range
Grade 9–10
- Focus: gases are identified by their behaviour, not their appearance, and observations must be recorded systematically.
- Activities: carry out the burning-splint, glowing-splint and limewater tests safely on each unknown; record every result in the table immediately; identify the three gases from the combined pattern; state which single observations would have been ambiguous on their own.
Grade 11
- Focus: the chemistry behind each test.
- Activities: write and balance the equations for the combustion of hydrogen and the reaction of carbon dioxide with limewater; explain why a glowing splint relights only in oxygen, in terms of collision rate and ignition temperature; explain why the tubes are clamped upside down for the splint tests and why carbon dioxide smothers a flame.
Grade 12 / College Level
- Focus: analytical logic and the design of qualitative test schemes.
- Activities: construct the full decision matrix for the three tests and show that each gas gives a unique pattern; account for the redissolution of the limewater precipitate in excess CO2 and its consequence for interpretation; determine the minimum sequence of tests that would identify each gas and which pairs each single test cannot separate; discuss how the scheme would fail for an inert gas such as nitrogen.
Laboratory essentials
Instruments
- Lighter
- Test tubes
- Wooden splints
- Lab stand
- Clamp
- Graduated cylinder
Products
- Unknown gases (#1 to #9)
- Limewater