

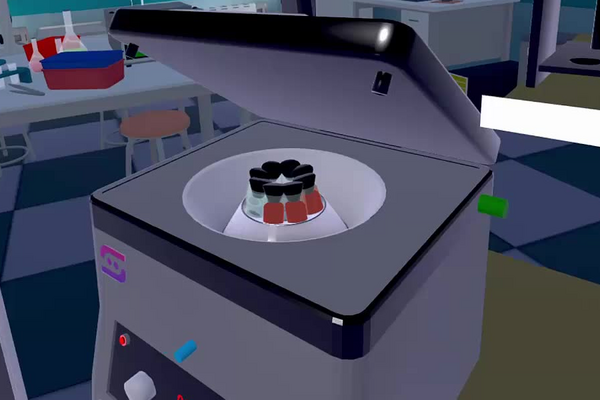
Centrifugation is a method that uses rapid rotational motion to separate components of a mixture based on differences in density. In clinical laboratories, this technique is essential for the analysis of biological samples such as blood, urine, and cellular suspensions.
By accelerating sedimentation, centrifugation allows components that would normally take hours or days to separate under gravity to do so in minutes.
Blood is a heterogeneous mixture composed of several elements, including red blood cells, white blood cells, platelets, plasma, and dissolved substances such as proteins and lipids. When centrifuged under controlled conditions, these components separate into distinct layers that can be observed and analyzed. Variations in the appearance or relative proportions of these layers provide valuable diagnostic information.
In this laboratory, you will centrifuge a series of blood samples, two of which originate from patients presenting pathological conditions: anemia, characterized by a reduced concentration of red blood cells, and lipemia, characterized by an excess of lipids in plasma. Through careful observation and interpretation, you will identify these samples and relate your findings to real clinical applications. Throughout the activity, particular emphasis is placed on laboratory safety, correct equipment handling, proper balancing of the centrifuge, and responsible waste management—skills that are essential in professional laboratory practice.
Educational Goals
Familiarization with the laboratory environment
- Discover the Proteus centrifugation laboratory by identifying its layout, equipment, and workflow. Learn how the laboratory is organized to ensure safety, efficiency, and reliability of experimental procedures.
Use of protective equipment
- Understand the importance of wearing personal protective equipment such as lab coats, safety goggles, and gloves when handling biological samples and operating mechanical devices.
- Develop appropriate habits for selecting and using PPE based on task-related risks.
Operation of centrifugation equipment
- Learn how to safely and correctly operate a laboratory centrifuge, including opening and closing the lid, setting speed and time parameters, starting and stopping the device, and recognizing normal versus abnormal operation.
Sample preparation and balancing
- Develop the ability to prepare samples correctly for centrifugation and understand the critical importance of balancing the rotor.
- Learn how improper balancing affects safety, equipment integrity, and experimental results.
Observation of separated phases
- Practice observing and describing the physical separation of blood components after centrifugation.
- Identify the number of phases, their order, thickness, and color.
Clinical interpretation of results
- Use observations to distinguish between normal blood samples and samples affected by anemia or lipemia.
- Understand how centrifugation supports medical diagnosis.
Protocol
Sample preparation
- Turn on the centrifuge by pressing the switch located at the bottom left on the front of the device.
- Open the centrifuge lid by pressing the button at the top on the right side of the device.
- Fill each of the empty 25 mL test tubes identified A, B, C and D with tap water.
- Put the caps on the openings of the test tubes.
- Place the water test tubes in the centrifuge tray at positions 1, 2, 3 and 4.
Note: These water test tubes will be used to counterbalance the 4 blood test tubes that will occupy positions 5 to 8 of the tray.
- Take a photo of the blood test tubes (the camera is located with the safety accessories near the recovery bin).
- Place the 4 blood test tubes in the centrifuge tray at positions 5 to 8.
Warning: Make sure that for each occupied space, there is a test tube filled with at least an equivalent amount of liquid in its opposite space. For example, a 25 mL test tube occupying space 1 should be balanced by another test tube with 25 mL of liquid in space 5.
Centrifugation
- Close the centrifuge lid by pressing the button at the top on the right side of the device.
- With the left dial, set the centrifuge rotor speed to about 2500 RPM.
- With the right dial, set the centrifugation time to about 5 minutes.
- Start centrifugation by pressing the blue button on the front of the centrifuge.
- Wait until the centrifugation time has completely elapsed.
Note: Time is accelerated 5x.
- Open the centrifuge lid by pressing the button at the top on the right side of the device.
- Take the 4 blood samples (positions 5 to 8) and put them back on the test tube rack.
- Observe the blood test tubes and take a photo of the result (the camera is located with the safety accessories near the recovery bin).
- Determine the sample from an anemic patient (i.e.: lack of red blood cells).
- Determine the sample from a lipemic patient (excess fat).
Note that a poorly balanced tray, a time that is too short or too long, as well as a speed that is too slow or too fast can lead to incorrect results.
- Turn off the centrifuge by pressing the left switch on the front of the device.
How many phases are observed in the test tubes?
Note the number of phases, their order, as well as their color.
Anticipated Outcomes
During this laboratory activity, students are expected to carefully observe the physical changes that occur in blood samples following centrifugation. Because centrifugation accelerates the natural process of sedimentation, clear and well-defined layers should be visible when the procedure is carried out correctly.
The following image depicts typical results:
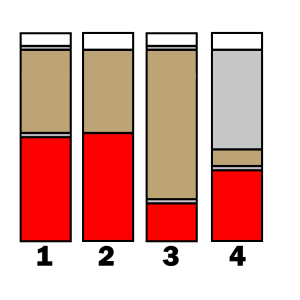
- Normal result (1), layers from top to bottom: plasma, buffy coat, red blood cells.
- Incorrect centrifugation (2), which can have partial mixing of components and abnormal distribution of phases.
- Anemia (3), with a very thin layer of red blood cells.
- Lipemia (4), with a large layer of lipids.
- Sample 2 should originate from lipemic patient.
- Sample 44x should originate from anemic patient.
General Observations After Centrifugation
Once the centrifugation cycle is complete and the rotor has come to a full stop, the blood samples should display distinct phases arranged vertically according to density. In properly centrifuged samples, the separation is sharp and stable, indicating that the selected speed, duration, and balance were appropriate.
Typically, three main phases are observed:
- Bottom phase – Red Blood Cells (RBCs):
This layer is the densest and appears at the bottom of the test tube. It is dark red in color and forms a compact, clearly defined region. The thickness of this layer reflects the relative proportion of red blood cells in the sample. - Middle phase – Buffy Coat:
Above the red blood cells lies a very thin, pale-colored layer known as the buffy coat. This layer contains white blood cells and platelets. Although thin, its presence confirms successful separation and should be noted even if it is difficult to see. - Top phase – Plasma:
The uppermost layer is plasma, which normally appears clear and yellowish. Plasma contains water, proteins, electrolytes, nutrients, hormones, and dissolved substances such as lipids.
Expected Results for a Normal Blood Sample
- In a normal blood sample, the centrifuged tube should show a well-balanced distribution of phases. The red blood cell layer occupies a substantial portion of the tube, the buffy coat is thin but visible, and the plasma is clear and transparent.
- The interface between layers should be sharp, with minimal mixing. This indicates that the centrifuge was properly balanced and operated at an appropriate speed and duration. Normal samples serve as a reference for comparison with abnormal samples.
Expected Results for an Anemic Blood Sample
- In samples originating from a patient with anemia, the most noticeable difference is a reduction in the thickness of the red blood cell layer. Although the overall structure of the phases remains the same, the bottom layer occupies a smaller proportion of the tube compared to normal samples.
- The plasma layer may appear relatively larger as a result of the reduced red blood cell volume. The buffy coat typically remains thin and unchanged. This observation reflects the clinical definition of anemia, which is characterized by a decreased concentration of red blood cells or hemoglobin.
- Students should compare the anemic sample directly with a normal sample to appreciate the difference in red blood cell volume and to confirm their interpretation.
Expected Results for a Lipemic Blood Sample
- In samples from a patient with lipemia, the most striking feature is the appearance of the plasma layer. Instead of being clear and transparent, the plasma appears cloudy, opaque, or milky, due to the presence of excess lipids suspended in the plasma.
- The red blood cell layer may appear normal in thickness, and the buffy coat remains thin. However, the altered appearance of the plasma provides a clear visual indicator of abnormal lipid content. This observation highlights how centrifugation can reveal chemical and metabolic abnormalities, not only differences in cell concentration.
Observations of Poor or Incorrect Centrifugation
If the centrifuge is not properly balanced, if the speed is too low or too high, or if the duration is incorrect, separation may be incomplete or unclear. In such cases, students may observe partial mixing of components and abnormal distribution of phases.
Interpretation and Diagnostic Reasoning
By comparing all samples, students are expected to determine:
- Which sample corresponds to an anemic patient
- Which sample corresponds to a lipemic patient
This determination is based entirely on observable physical characteristics, reinforcing the idea that laboratory diagnostics often rely on indirect evidence rather than direct measurement.
Reliability and Consistency of Results
When the protocol is followed correctly, the results should be consistent and reproducible across trials.
The expected results emphasize that centrifugation is both a powerful and sensitive technique, requiring precision, attention to detail, and critical evaluation.
Summary of Assignment by Grade Range
Grade 9–10 (Introductory Level)
At the introductory level, this laboratory is designed to build foundational laboratory awareness while introducing students to the concept of centrifugation in a highly guided and observational context. The primary emphasis is placed on laboratory safety, correct behavior, and the ability to recognize visible changes in biological samples after centrifugation.
Students at this level focus on identifying the main components of blood once separated: red blood cells, plasma, and the buffy coat. Rather than performing detailed quantitative analysis, they are encouraged to describe what they observe using clear and appropriate vocabulary. Comparisons are made between samples to highlight obvious differences, such as thicker or thinner red blood cell layers and clear versus cloudy plasma.
Teacher guidance plays a central role. Instructions are broken down step by step, and students are supported in learning how to operate the centrifuge safely. The objective is to develop confidence in the laboratory environment while reinforcing essential safety habits such as wearing personal protective equipment, respecting equipment, and disposing of materials correctly.
Learning outcomes at this level include:
- Recognizing laboratory hazards and applying safety rules
- Identifying basic blood components after centrifugation
- Describing observations accurately and systematically
- Understanding that laboratory techniques can reveal information about health
Grade 11 (Intermediate Level)
At the intermediate level, students are expected to take greater responsibility for both the technical execution of the experiment and the interpretation of results. The laboratory shifts from simple observation to structured analysis, where students must connect experimental outcomes to underlying physical and biological principles.
Students independently prepare and balance samples, select appropriate centrifugation parameters, and verify correct operation of the equipment. They analyze the appearance and relative proportions of the separated layers and compare samples to identify abnormal conditions. The concepts of density, sedimentation, and centrifugal force are explicitly discussed and linked to the observed results.
They evaluate how balancing, rotor speed and centrifugation time each shape the phase separation. Students are encouraged to justify their conclusions using evidence rather than assumption, reinforcing scientific reasoning skills.
Learning outcomes at this level include:
- Correct and independent operation of a centrifuge
- Interpretation of centrifugation results using physical principles
- Comparison of normal and abnormal samples
- Identification of anemia and lipemia based on observable evidence
- Recognition of procedural limitations and potential errors
Grade 12 / College Level (Advanced Level)
At the advanced or pre-university level, the laboratory becomes an exercise in critical evaluation and clinical reasoning. Students are expected to demonstrate mastery of both technique and interpretation, as well as the ability to assess the reliability of their results.
Students critically analyze centrifugation parameters and justify their choices based on scientific reasoning. They evaluate the sensitivity of the technique and discuss how small changes in speed or time could alter diagnostic outcomes. Greater emphasis is placed on understanding the clinical implications of observed abnormalities and how centrifugation supports medical decision-making.
Connections are made to real clinical laboratory standards and quality control practices.
Learning outcomes at this level include:
- Justification of diagnostic conclusions using evidence
- Understanding of centrifugation as a clinical diagnostic tool
- Application of professional laboratory standards
Laboratory essentials
Instruments
Centrifuge
- 8x 25 mL test tubes
- Test tube caps
- Test tube rack
- Camera
Products
- 4x blood samples