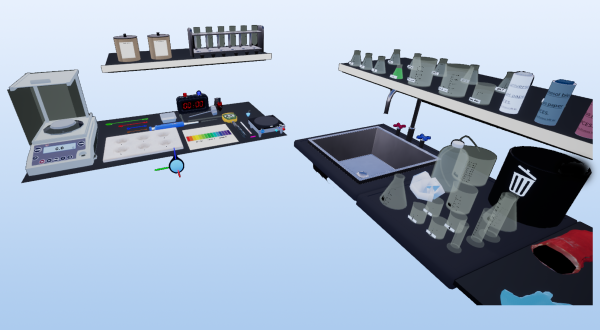
This experience describes immersion in a virtual laboratory environment, using virtual reality (VR) or augmented reality (AR) to simulate scientific experiences.It aims to familiarize participants with virtual laboratory equipment and basic chemistry procedures, emphasizing the use of immersive technologies for education and training.
Educational Goals
- Familiarization with the virtual environment: Learn to navigate and interact with a simulated laboratory environment, using AR or VR commands to manipulate laboratory objects and equipment.
- Use of protective equipment: Understanding the importance of personal protective equipment (PPE) in a laboratory, even in a virtual environment, highlighting safety practices.
- Substances measure: exercise to measure the mass of solids and the volume of liquids using virtual laboratory instruments, such as electronic scales and graduated cylinders, to develop skills in manipulation and precise measurement.
- Virtual chemical experimentation: carrying out basic chemical experiences, such as checking the pH of a solution, to understand the chemical reactions and the properties of substances.
- Analysis and communication of results: Learn to analyze the results of experiences in a virtual interface and to communicate these results, illustrating the importance of documentation and communication in science.
- Challenges to overcome: Protect yourself: virtually put the necessary PPEs before starting the experiences. Weigh a solid substance in powder: use virtual instruments to precisely measure the mass of a powder.
- Measure the volume of a liquid substance: apply volume measurement techniques to prepare a solution. Check the pH of a solid sample: Understand how to prepare a solution and test your pH using chemical indicators. Recover and send the results: use the virtual interface to examine and share the results of the experiments.
This immersive experience offers an innovative approach to scientific education, allowing participants to learn and practice laboratory techniques in a secure and controlled environment, without the risks associated with real chemicals. It highlights the potential of virtual reality technologies and augmented in teaching science, offering an interactive platform for the exploration, and understanding of scientific concepts.
Protocol
In the top right corner of your workspace, there are two cylindrical buttons. You can switch between virtual reality and augmented reality at any time by pressing the left button, or make the interactive whiteboard appear and disappear by pressing the right button.
In the room there is a poster showing the basic controls if you are in virtual reality.
To pick up an object with hand tracking, place your open hand facing the object, when the object turns green (symbol that it can be picked up), completely close your fist to pick up the object.
To release the object with hand tracking, you simply have to reopen the hand.
To pick up an object with the controllers, place your hand opposite the object. When the object turns green (symbolizing that it can be picked up), press and hold the pick-up button.
To release the object with the controllers, simply release the pickup button.
You can return to the Meta menu at any time by pressing the Meta menu access button or, in hand tracking mode, by making the gesture indicated on the basic controls poster.
In case of a problem, you can also reset the experiment by pressing the “Restart” button on the tablet. This can be found in the options menu, which is accessible from the main menu.
Before any experiment, it is important to equip oneself with the appropriate protective equipment.
1. Put on the smock.
2. Put on safety glasses.
3. Put on the nitrile gloves.
Weigh a solid substance in powder form
Some laboratory instruments can be used to collect and transport solid or liquid substances.
Among these instruments, some like the tweezers or the pipette, require an additional action for their operation.
In hand tracking mode, once the interactive object is picked up, join the thumb and index finger to activate the object’s interaction.
With the controllers, press the interaction button to operate the object.
Some laboratory instruments may require pressing buttons. To press a button, push it with a finger.
4. Place the weighing basket on the platform of the electronic scale. (Close and then reopen the hand)
5. Press the “Tare” button located on either side of the digital display of the scale to zero it out. (Touch with a finger)
6. Using the weighing basket, weigh approximately 38 g of sodium chloride. To do this, remove the lid from the corresponding brown container. Then, take one of the spatulas available to you and put it in this container. You should see that it is now full of powder. Finally, tilt the spatula over the weighing basket to pour. Repeat the operation with different spatulas until you have reached the desired 38g. Since NaCl has a density of 2.16g/mL, you will need to weigh 17.5mL. The spatulas are calibrated to 5mL, 2.5mL, 1mL, and 0.12mL.
Use the hot plate.
7. Using the graduated cylinder and the washing bottle, measure 100 mL of distilled water. A washing bottle full of distilled water is located to your right. Be careful to measure accurately using the meniscus!
8. Pour the measured distilled water into a 250mL Erlenmeyer flask.
9. Pour the sodium chloride from the weighing boat into the Erlenmeyer flask. It is normal for a precipitate to form at the bottom (NaCl).
10. Insert a magnetic stick (small blue cylinder to the left of the hot plate) into the Erlenmeyer flask. Simply bring it close to the opening of the Erlenmeyer flask and release it.
11. Close the Erlenmeyer flask with a two-hole rubber stopper with a glass elbow. It is behind the heating plate.
12. Place the Erlenmeyer flask on the hot plate.
13. In the available hole on the cap, insert a thermometer.
14. Start the magnetic stirrer (left button of the hot plate). Then start the digital stopwatch at the bottom of your work plan.
15. Set the hot plate to 105°C using the adjustment buttons on the right side of the device. This involves pressing the “+” button and holding it in place until the chosen target temperature is reached. The precipitate should dissolve in the water as the temperature increases.
16. Check the boiling point of water (100°C) on the thermometer, as well as in the results table. This latter is accessible by returning to the main menu of the tablet. Once in the results section, 2 sub-sections are available to you, the table and the graph. The table is a log of your experiment while the graph provides you with concise information on the main variables of it.
Note that in this experiment, the boiling speed of water is multiplied by 2.
Heat without exceeding the boiling point of water by 5°C and ensure not to burn the solute.
18. When almost all the solvent (water) has been vaporized and a solid residue is visible (NaCl), lower the temperature of the hot plate to the minimum. The vaporization should take a little over a minute.
Determine the acid-base character and the pH of a liquid substance.
19. Dip a universal pH indicator paper into the beaker of 0.1 M hydrochloric acid.
20. Compare the obtained color with those available on the pH chart.
21. One can also measure using a pH meter.
22. Immerse the electrode of the pH meter into the same beaker.
23. Read the measurement on the digital dial.
24. Rinse the electrode with distilled water.
25. Dry the electrode with absorbent paper.
Anticipated Outcomes
- The Erlenmeyer containing HCl 0.1M, will display a pH of approximately 1.
- The red litmus paper will stay red (solution is acidic).
- The blue litmus paper will turn red (the solution is acidic).
- The solubility of NaCl at 25°C is 360g/L and increases with the rise in temperature. Once water has evaporated, the NaCl will remain in the container.
Summary of Assignment by Grade Range
Grades 3-5 (Ages 8-10)
- Focus: Basic navigation, introduction to PPE, and simple volume measurements.
- Activities: Putting on PPE, measuring liquid volumes, and simple solution preparation.
Grades 6-8 (Ages 11-13)
- Focus: Intermediate navigation, detailed use of PPE, and precise measurement skills.
- Activities: Putting on PPE, measuring solid masses and liquid volumes, and basic pH testing.
Grades 9-12 (Ages 14-18)
- Focus: Advanced navigation, comprehensive PPE use, precise and accurate measurements, advanced chemical experiments, and result analysis.
- Activities: Putting on PPE, measuring solid masses and liquid volumes, advanced pH testing, and analyzing and communicating results.
Laboratory essentials
Instrument
Beakers (50ml, 250ml & 1000ml)
Bucket plate
Droppers
Electronic Scale
Erlenmeyers (250ml)
Glass Rod
Graduated Cylinders (25ml & 100ml)
Hot plate
Magnetic stirrer
Paper towel
pH meter
Pipette
Spatulas
Test Tubes
Thermometers
Timer
pH chart
Products
HCl 0.1M solution
NaCl crystals
Blue & Red Litmus papers
Universal pH strips